


|
|
|
#12
 03-14-2009, 04:41 PM
|
||||
|
||||
|
Having been out of the net for a while, I am coming to this thread a little late.
Excellent choice of subject and good info on some innovative techniques, Jay! I've always thought those subchasers were very attractive little ships and I'm glad to see you building one. Don 
|
|
#13
03-14-2009, 07:10 PM
|
||||
|
||||
|
Thanks Guys,
I must admit that I really should have started off with this one first to test the card model waters as it were. Much smaller and offers a lot easier time with fewer issues, at least so far. I have managed to get the bow set up arranged, although I trimmed the forward bollards down to the width of the paper parts that were supposed to be rolled up to form them, but they looked a bit tall to me. To cure the issue I turned to (yes, I know it is not politically correct and an alternative heat source could no doubt be used, but I used what was handy for me) a lit ciagarette and applied it just over the tops of them to heat them up and flatten their tops shortening them in the process. The tiny capstan has all of 11 separate pieces used in its' construction plus the two pieces of anchor chain that I added. I used a pin vise and three different sized minidrills graduating up in size to make the holes plus a compass point to mark the spots to drill so that they initial drill holes didn't wander about. I also added the breakwater and its' supports, all this has taken me to step 6 of the instructions. 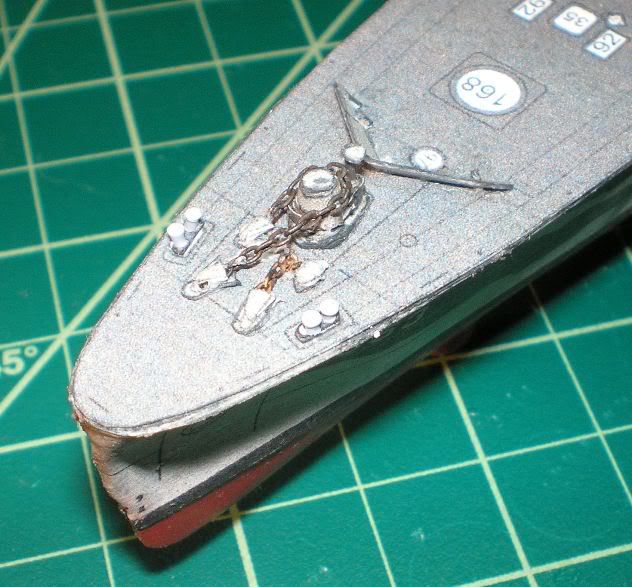 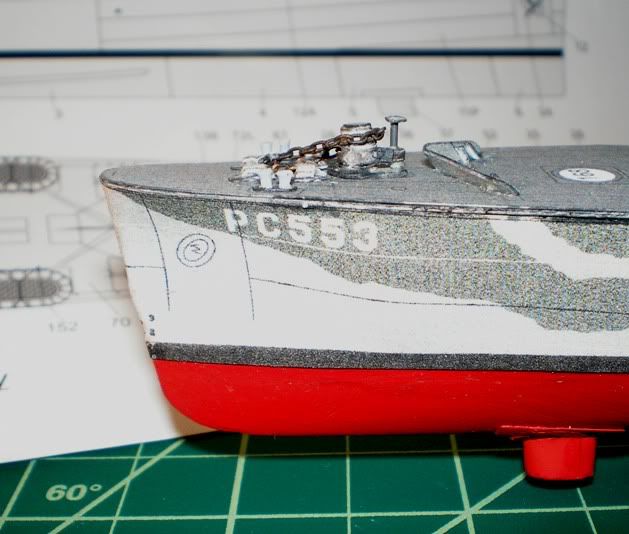 While I was assembling the small stuff, I also made up the two life rafts, twice. I am still not happy with them but here is where I got to so far. The first ones on the left are as the kit would have you make them, they seemed pretty flat and one dimensional to me so I made a second stab, placing the first set of top parts on the bottom. Then I took another set of the top parts and cut out the centers and glued them to the top of the surrounding edge pieces. A second set of the edge pieces got shortened and added to the inside. While they do look a little better with a bit of depth, studying the picture on the front shows them to actually be rounded and not square all around. I am also not too sure about that lovely orange color, I was under the impression that this was an "after the war color", during the war, I thought all that sort of thing was actually supposed to be gray, anyone out there have any factual information on this matter, please let me know. In fact, anyone having any suggestions as to how to turn these out as rounded all the way around I would be interested in hearing about your methods before getting too carried away with my experimentation. 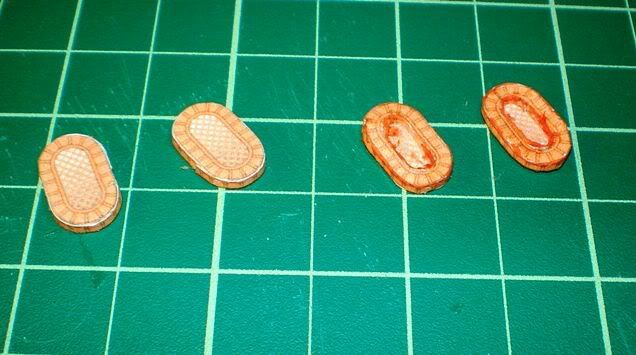 Step 7 in the instructions calls for cutting out and folding up the depth charge racks that go on the fantail. I did cut the parts out, folded them up and glued them together, but not to add to the fantail. I used them for measuring guides to cut out pieces parts to come up with my own home brew depth charge racks. The original parts are blocky solid forms that rely on printed drawings of depth charges surrounded by drawn on racks, not very detailed. Instead, I am going to build my own up from brass strips cut from the saved up PE fret material that I have on hand and some card pieces here and there as well as some styrene rod and sheet depth charges to fill them with. In this large a scale, I feel that I like that better than a pair of printed box shapes for that bit of detail. So here are the beginnings of my efforts in that direction. I used some card cut outs for the feet and will add the last upside down "U" shaped pieces once I cut out the triangular supports that held the outer edges in place, the inner leg being firmly welded onto the deck. Once I have all four of them in place I can add the side rails and other details. 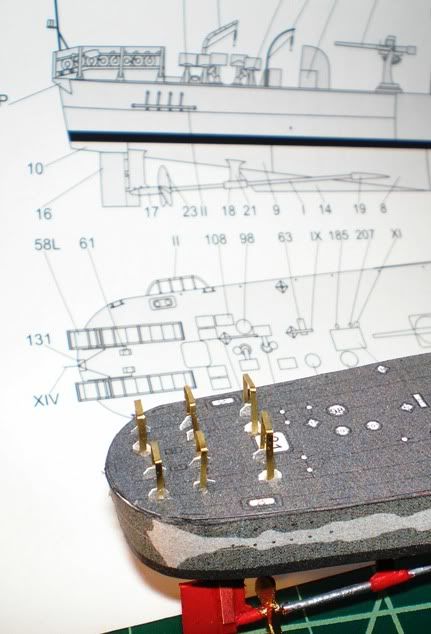 Stay tuned for more of my madness as I work my way through the USS Malone. That, by the way, was the name that they finally named the ship, although this did not happen until February 1, 1956 while she was laid up in reserve for whatever reasons the US Navy may have had. A little over a year later on September the 5th of 1957 she was stricken from the Navy List and sold for scrap to the Boston Metals Company on July 1st, 1958.
__________________
Jay Massey treadhead1952 Las Vegas, NV
|
|
#14
03-15-2009, 09:46 PM
|
||||
|
||||
|
Ahoy Shipmates,
I got to tinkering some more with the life rafts for the PC 553 this evening. After looking at them and trying to emboss the top portion of one with a bit of styrene rod, I wound up making a oval raft shape and decided the best thing to do to get where I wanted to go was to just glue the card parts to the styrene shape and be done with it. So here is where I got to tonight. 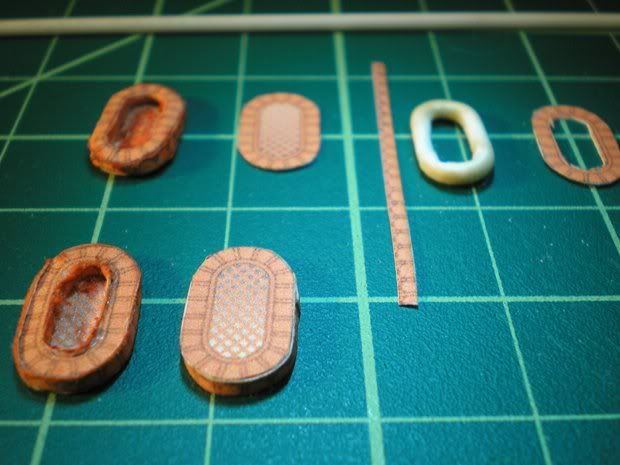 It does have the curved shape and looks better than a simple flat cut out part so I may stick with this plan. The next thing I am going to try is to print it out black and white on the copier and see what sort of colors it comes up with. If it isn't too dark, I may stick with this idea for the shape and embellish it with some black thread for the lines that go over the outside shape as well as some paddles and possibly a water cask and supply box which is what was stored on board for emergency use. There will probably be a line or two as well for handling the little craft. 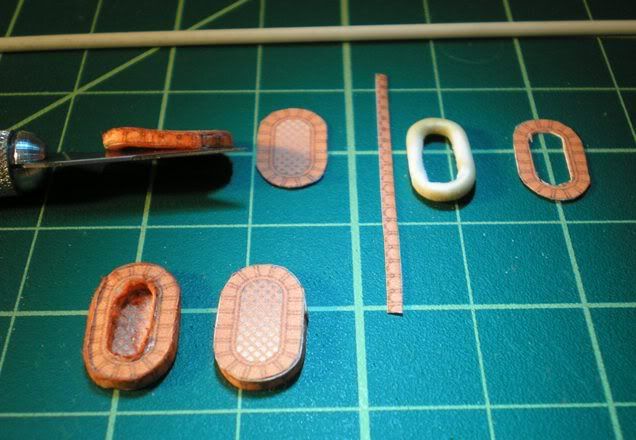
__________________
Jay Massey treadhead1952 Las Vegas, NV
|
|
#15
03-16-2009, 06:11 AM
|
||||
|
||||
|
Good life rafts.
They look fine as is, but having made the rounded styrene inserts, can you rub your thumb around the edges of the card covering to make them follow the shape of the styrene insert and give them a more rounded look? Don
|
| Google Adsense |
|
#16
03-16-2009, 05:36 PM
|
||||
|
||||
|
Hi Don,
After cogitating on the matter while at the salt mines today, I figured out that I had a couple of choices to make. I like the idea of the gray colored rafts, International Orange being a shade that I have tracked down as being used after the hostilities were over with, so printing out copies in B&W once I got home showed that it is possible without any adjustments to be made. The second idea is rather than printing it out on the 65 pound cardstock I have been using for all the other parts, I will just print them out on a sheet of typing type paper and hopefully the parts will conform to the inserts a lot better that way. The major malfunction being the thicker material leaves the edges sticking out further than I like. I may also try some good old Elmers rather than Aleenes' Tacky Glue for this chore to make the paper conform a little better being wetter. After I hose off and stuff my neck with some vittles I will try a little experimentation to see how my brain storming works out. Of course, most anything in my brain is a bit of a storm anyway.........  :D :D
__________________
Jay Massey treadhead1952 Las Vegas, NV
|
|
#17
03-18-2009, 11:56 PM
|
||||
|
||||
|
Ahoy Shipmates,
I got a little time to tinker at my required two life rafts today. I printed out the pair on a sheet of regular copy paper as well as a sheet of the 65 pound card stock I have been using for everything else. This time around I used the B&W copy feature rather than color to turn out a set in WWII Gray or at least as close as that would allow me to. Clipping them out with scissors and then trimming the center out of a pair of the copys was short work. I used some Elmers White Glue covering the backsides of the copys and then molded them to the styrene forms pressing the covered parts down on a mousepad. The patterened strips went on around the circumference next. I clipped out a pair of the card stock raft pieces and trimmed them close to undersize and glued them face up to the bottom of my projects. The remaining paper parts got glued to the bottom of the card stock parts to cover the white up so that they look the same overall. Once the glue dried I got out a length of black sewing thread, ran it onto a needle and white glued about an inch and a half of the thread back onto itself at the needles eye so that I would have a single thread that I could work with. Knotting the free end so that it would lock in place, I started on the underside and using the patterned parts as a guide, looped the thread around the outer ring. Once I had it completely gone around I used some more Elmers to lock the thread and make it so that there were no fuzzies anywhere. The thread adds an extra layer of depth to the detail that the printed parts lack and show off the curved shape a lot better. So here are the generations of my raft project so far. 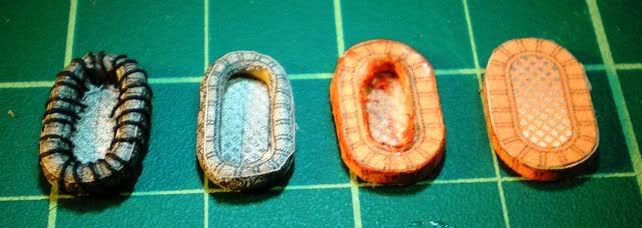 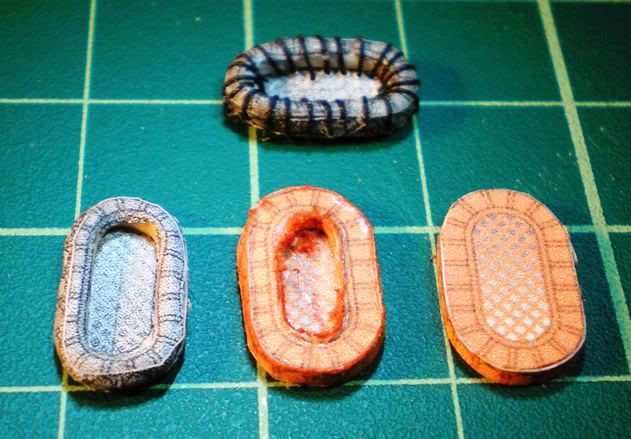 I will add a few things before I get ready to tie them in place on the ship but they look more like what I have in mind as opposed to the International Orange ones.
__________________
Jay Massey treadhead1952 Las Vegas, NV
|
|
#18
03-19-2009, 12:32 AM
|
||||
|
||||
|
Forming copy paper by softning it with glue is a good idea when using a mold which has smooth surface(I guess stylene forms have smooth surface. doesn't it?). I will try it in my ship build. Thanks for the tip
Last edited by Yu Gyokubun; 03-19-2009 at 12:43 AM.
|
|
#20
03-19-2009, 07:50 AM
|
||||
|
||||
|
Thanks Guys,
Mike from Gremir Models got me to thinking about the fun of making and detailing out these little extra items. Taking a flat sheet of paper or card and turning it into something three dimensional is the fascination that drives this end of the model making hobby. While a chunk of manufactured styrene in a kit is one way to do it, creating your own from paper or card is far more interesting as well as forces one to experiment. That experimentation adds to the enjoyment of the hobby for me. While the results may not always happen as intended, you generally learn from them anyway.
__________________
Jay Massey treadhead1952 Las Vegas, NV
|
| Google Adsense |
 |
|
|


 Linear Mode

