 |
|
#1
|
||||
|
||||
|
1:600 Brederode (War Artisan free model)...
Seeing the Spanish galleon on Jeff Knudsen's War Artisan site a few months ago prompted me to get back into card modeling. Decided that it would only be right and proper if I at least made one of his kits so here's my latest work-in-progress, his 56 gun Dutch ship, the Brederode. As always, it's a learning process.
Having the helping hands magnifying glass did indeed help. My cutting has been fairly accurate on this one. Though it did mean I had to move my work space off my lap and onto a desk. I'm still not happy with my edge coloring techniques. I want to try some of the watercolor pencils I've read about. Also, I'm not really set up with a way to drill clean holes for the masts. I started the holes with a needle, then gradually enlarged them using a pointed dental tool until the masts could slip through the holes. It was labor intensive and put quite a bit of stress on this tiny model. And, this method doesn't really cut through the paper, it just pokes a hole and then frays it as you make it larger. It's not a neat solution with little rings of frayed paper at the openings. Any suggestions on how to avoid that? I noticed Micromark has some nifty little finger drills but at $17 for a set of 4 I'm a bit hesitant. Anyone use them before? The masts are made of plastic rod rather than wire. The sails will probably be added tomorrow. --jeff |
| Google Adsense |
|
#2
|
||||
|
||||
|
I have used something called a pin vise with some very small diameter drill bits. Depending on the quality of the vise and drill bits you need to take your time to drill a small hole without the bit slipping in the pin vise or tearing the card stock.
Here is an online store with some inexpensive pin vises. Widget Supply Do a search for pin vise. You can get an idea of what they are. A local hardware or hobby store might have some for less than the $17 + shipping that Micromark charges.
__________________
~Doug~ AC010505 EAMUS CATULI! Audere est Facere THFC 19**-20** R.I.P. it up, Tear it up, Have a Ball Last edited by SCEtoAUX; 12-28-2016 at 03:35 PM. |
|
#3
|
||||
|
||||
|
What a great site. I see I'll be browsing for hours. Thank you.
--jeff |
|
#4
|
||||
|
||||
|
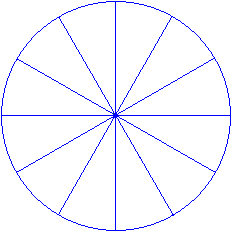
Cut the circle for the hole into sectors like slicing a pie.
Push the rod through the circle and the sectors will be left inside the model. No frayed edges will show. It would be best to do this before the model is built. 
|
|
#5
|
|||
|
|||
|
"using a pointed dental tool until the masts could slip through the holes." try heating the dental tool to glowing red on the stove and then touching the place where you want the mast to go. in 2 or 3 re-heats/apply you will have a clean hole.
|
| Google Adsense |
|
#6
|
|||
|
|||
|
Ah that's a great tip, I'm in the middle of an Star Wars AT-ST build and there's loads of barrels, this will make my life so much easier.
|
|
#7
|
||||
|
||||
|
Both good suggestions. Thank you.
I'm not sure I can slice a 1.5 mm pie but certainly for larger holes this will work. I like the red hot poker suggestion. That way I can draw blood and cauterize the wound at the same time.  I'm assembling another hull while I await a delivery from Widget Supply. I ordered some 'bead reamers' which I think will work quite well at this small scale. I purchased a caliper, some rulers, two pin vices and some bits. Ah, the anticipation. Collecting the tools is almost as much fun as building! --jeff |
|
#8
|
|||
|
|||
|
I tend to use a rat tail file for this sort of task - a relic of my Airfix days, no doubt.
|
|
#9
|
||||
|
||||
|
Even the rat tail was a bit too big for this job. But my new favorite tool is the bead reamer I got from Widget Supply. It's in the third picture. It is essentially a very finely pointed diamond file. The end cap of the handle screws off for storage inside and then, of course, a collet at the front to hold the tool. I intend to get another of these to hold a bamboo skewer as a glue applicator. The handle is thick enough that I can grasp it easily and the pocket clip prevents it from rolling away.
The ships are progressing. One is ready for rigging. Not sure I'm looking forward to doing that but some rigging is essential for sailing ships. They always look unfinished without it. --jeff |
 |
|
|