


|
|
|
#1
 06-01-2022, 06:35 AM
|
|||
|
|||
|
So shortly after I got the pirate kit, I got the real thing from GPM in Poland along with the upgraded laser forms, and lifeboat oars. First two photos are the real kit on the table and the bogus/practice one in the position of shame below the desk. This will be my first paper model but one of many I've built through my life in various media. First questions... reading instructions suggests using paint in a lot of places (oil of course). Is that something people do besides edge touch up or should we use the nicely printed colours in most areas? I'll buy paint if I must but I'd be worried about spoiling the look or wrinkleage/coating.
The Real Deal:  The Conterfeit (spelling/pun intentional) 

|
| Google Adsense |
|
#2
06-01-2022, 06:57 AM
|
||||
|
||||
|
Good Morning!
I use felt pens to do my edges. There are some sets available with many colors (Sets with about 100 can be found on Amazon, although the colors we need are invariably somewhere between the shades the sets offer!). Normally I'll choose two felt pen colors for each basic model color. The first is a slightly lighter color than, for example, your hull red and is for the edge of the paper where you've made the cuts. You go lighter because the paper grains draw in the ink and the color appears darker than you expected. You must use a light touch with the pen -- don't just sit the pen in one place because the paper will keep pulling in the ink until you move. You can practice on some scrap paper from the kit. The second pen is darker than the first and is used for the flat surface of the paper in places where an attaching part doesn't quite fit to the line and white paper would show. Felt pen colors never match perfectly but they still disguise the cuts and joints and are easy to use, and the overall model looks much better. (By the way, I know there are skilled people who can mix the paints to get precisely the right color, but I am not one of those!) Best regards, Kurt
|
|
#3
06-01-2022, 03:55 PM
|
|||
|
|||
|
Faber Castell Pitt India ink pens are best and do not bleed. Kurt is correct, you don’t need exact colour matches.
__________________
Fred Bultman
|
|
#4
06-01-2022, 05:14 PM
|
|||
|
|||
|
So the general consensus is overall painting of large surfaces would be burdensome and spoil the look. I'm wondering if the painting recommendations in the instructions are for covering mistakes by lesser model makers (a wider target audience). I also notice some of the laser cut parts like S1, S2, and S3 in the instruction book are called plywood. There aren't any wooden parts in the kit or the upgraded kit (with laser cut pieces).
|
|
#5
06-02-2022, 08:41 AM
|
||||
|
||||
|
Good Moring,
I'll say that the laser cut parts quickly destroy a knife blade as though their material is plywood, so the word actually comes close. There is some kind of wood grain in there... My markers are water-based and nowhere near the quality of the Faber Castell Pitt set, so I have to be quick on touching the tip to the edge of the paper, as I mentioned. Oh, and glue can smear the color also, though I've not had much trouble with that. But the sets are available on Amazon (100 pens, about $20 U.S.). By the way, I haven't had to paint large surfaces, just edge areas because I did not want a thin white line showing since my assemblies NEVER fit just right. Some kits print the main color past the border lines and then you don't have to worry about coloring the surface along the borders. (If they're not printed that way, I always color the border area before I ever glue the assemblies to that place -- would be hard to do with a felt pen afterwards without getting it on the good color.) Take care, Kurt
|
| Google Adsense |
|
#7
06-02-2022, 11:15 PM
|
|||
|
|||
|
Quote:
|
|
#8
06-02-2022, 11:37 PM
|
|||
|
|||
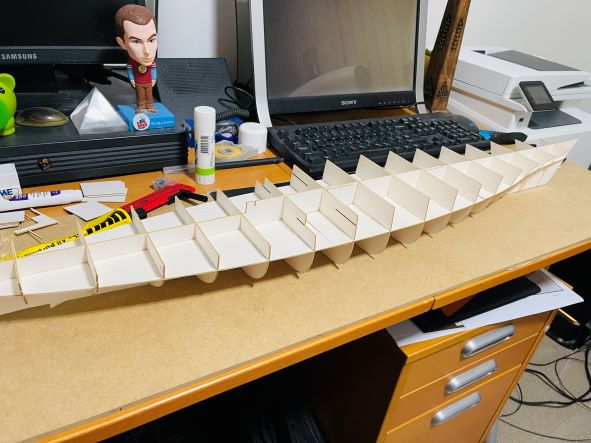
 Made first mistake... thought the joiners were supposed to be folded around the end. Folded on line which is a guide line. Don't do this. I will reinforce these if needed but I think the rest of the frame will make things strong enough.   
|
|
#10
06-05-2022, 07:53 PM
|
|||
|
|||
  One advantage to the pirate kit is it came with extra .5, 1mm, and 2mm cardboard. The GPM kit and laser forms doesn't include the ** and * boards so free stiffeners.  My gluing/laminating setup. I learned I have to clean the rolling pin well. Still pondering if I should switch to glue stick.  
|
| Google Adsense |
 |
|
|


 Linear Mode

