


|
|
|
#1
 10-15-2011, 11:06 PM
|
||||
|
||||
|
Ship modeling advice needed!
Hi everyone,
It's been some time since I've posted or even built anything for that matter. I've started up again and it feels soooooo good! Marek's Sopwith Snipe is on the mat in 1:24 and the other thing I have on the go is the Shipyard HMS Bellona. I've been studying the ship builds like crazy here and I've reached a point where I need some advice. The Bellona's bulkheads have all been laminated, cut out and dry assembled. It freaks me out how sturdy the framework becomes and how seemingly straight it all looks. My question is this...where and how should I start gluing the bulkheads? should I be cutting and using small 90 degree little triangles to keep everything aligned perfectly or go with it as it sits and just glue the contact points? I realize that errors now will only compound themselves later so it's really daunting! Should I be gluing both sides of a bulkhead at it's contact points or only one side? Man, I'm lost and any advice from you nautical types would really be appreciated!! After following Doris' build of Victory, I've also decided to substitute the decking and hull paper. I found a source of wood veneers that should look astounding! My camera is pooched but I'll see about doing a thread when I get another possibly around the end of the month All the best! Ron
__________________
http://burnedofferings.com/shop 
|
| Google Adsense |
|
#2
10-15-2011, 11:42 PM
|
||||
|
||||
|
Ron, my own preference is to use the gussets and not trust my calibrated mark II eyeballs for keeping the framework straight.
__________________
It's not good to have too much order. Without some chaos, there is no room for new things to grow.
|
|
#3
10-15-2011, 11:49 PM
|
||||
|
||||
|
Darwin,
You mean to say you haven't upgraded to the Mk III's yet?  I will do as you say. Thanks!! Ron
__________________
http://burnedofferings.com/shop
|
|
#4
10-16-2011, 12:38 AM
|
|||
|
|||
|
What ever you do, do it symmetrically and glue the deck on first, the will make the whole ship more rigid. If this is not possibly, then glue a temporary assembly on to keep the bulkheads aligned.
|
|
#5
10-16-2011, 07:29 AM
|
|||
|
|||
|
Ron,
you are right towant to keep the hull framing straight and not to trust the eyeballs. Darwin and Zathros have correct ways too help with this. I would suggest also to draw an accurate grid on the botton of the deck starting with the keel line. and making a base jig for the keel while adding the bulkheads. Also try Model Ship World at Model Ship World :: Home a great site for nautical models. George
|
| Google Adsense |
|
#6
10-17-2011, 11:47 PM
|
||||
|
||||
|
Thanks to all of your kind advice I've gotten the major bulkheads and keel all glued up.
It even looks straight! I'm going to borrow my son's 'Crackberry' and snap a few pictures so that I might bug you guys some more tomorrow Thanks a million Ron
__________________
http://burnedofferings.com/shop
|
|
#7
10-19-2011, 11:41 AM
|
||||
|
||||
|
As promised, the awful images from the Blackberry. I need to play with it a bit before I actually start a build thread. Exposing you guys to too many of these is detrimental to eyeballs! I really miss my old Canon camera. The bulkheads are together for the most part as you can see. The bit of decking is only just sitting in place. I know it's not standard 18th and 19th century British practice but what do you guys think of doing the entire ship in cherry? Lee Valley Tools has pre cut cherry veneers in the correct widths for decking and planking. Check out the cherry strips
Project Woods - Lee Valley Tools - Woodworking Tools, Gardening Tools, Hardware Supplies 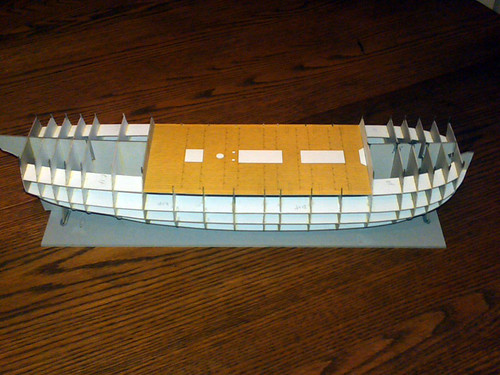 023 by ron0909, on Flickr 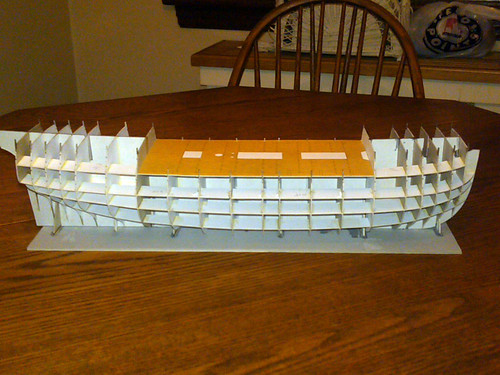 022 by ron0909, on Flickr
__________________
http://burnedofferings.com/shop
|
|
#9
10-19-2011, 11:57 AM
|
||||
|
||||
|
Nice, Ron! Once glued up really the formers take on a great strength. As I'm sure you can see. The look to avoid to me is to see any of these formers later through the "planking". So I sand the formers down a bit after glued and dried, and then really make it smooth after the "first planking" the card peices that ShipYard uses to cover them. I find I need putty on the first planking to get it perfect, but not much as you can and spray the first planking layer before using any water based filler, and then the planks go on smooth as butter. Love the Bellona... you are in for a treat building her..
note..I have used resin based fillers also, and the benefit is lack of any shrinking later, the downside is it is heavy, and more difficult to work with if not used to (dries very hard, harder than the paper)
__________________
regards Glen
|
|
#10
10-19-2011, 11:58 AM
|
||||
|
||||
|
I was going to suggest a base jig type thing as well, but now I can see you've done just that, and you've done a damn fine job of it too, you're off to a great start.
|
| Google Adsense |
 |
|
|


 Linear Mode

