


|
|
|
#1
 02-27-2009, 08:10 AM
|
||||
|
||||
|
Spoked wheels tutorial, by Norman Gorn
Norman Gorn is a very active card modeler from Toronto, Canada, mostly writing in German at Kartonbau.de. He has kindly offered to translate a very interesting thread/tutorial he made at that site on how to make spoked wheels in a seemingly much easier and relaxed way than we are used to seeing.
What follows is Norman's own description of his method. 
|
| Google Adsense |
|
#2
02-27-2009, 08:11 AM
|
||||
|
||||
|
Spoked wheels the easy way, by Norman Gorn
[This is Norman Gorn's own translation of his thread at Kartonbau.de in German:]
Hi Gluegoons, Using thread for making spoked wheels is not new, a fellow named Eric Goedkoop already has a thread on this subject [download Eric Goedkoop's tutorial from this site], which shows a very elaborate and highly accurate way of creating spoked wheels with the help of simple sewing thread. My method is nowhere near as involved as Eric's, but it is also nowhere near as accurate either. If you just want to have spokes and don't really care if they are arranged exactly by the same pattern as on the original, my method should be all you need. It does not require any planning, you can just start laying your thread and create two nicely spoked wheels within roughly one hour. 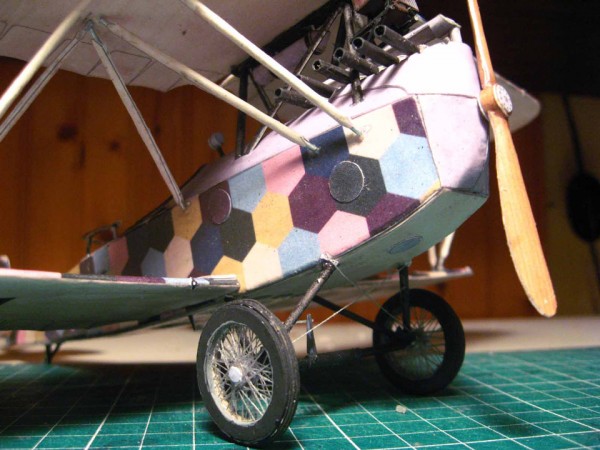
Last edited by Leif Ohlsson; 02-27-2009 at 08:15 AM.
|
|
#3
02-27-2009, 08:12 AM
|
||||
|
||||
|
Looping the threads
[This is Norman Gorn's own translation of his thread at Kartonbau.de in German:]
So then, let's get going. All we need to start out with is cardboard ring the size of the tire we want to end up with, in my case this was already part of the kit, since the tires were shown as rings. Sort of like a "tire template". We now take the thread and start looping it around the ring template in a pointed "V" shape. We start at the pointed end of the "V".  Once we've got out first "V", we then make a second one, this time starting out at the exact opposite side of the tire template in a way that the two "V"'s are now crisscrossing each other. Don't worry at all about the tension of the spokes, the tension will develop on its own, trust me. We get the gap at the open end of the "V" just by eyeballing it, just spread it so that we get a nice hole in the middle happening, which will be just big enough for the hub of the wheel. After that we do another set of two opposing, crisscrossing "V"'s, but this time set off by 90 degrees from the first set.  You can already see the hole appearing in the middle.  Between these two crisscrossing "V" windings we will find just enough space on the template ring for another two sets, these ones will now be set off from the original windings by 45 degrees. 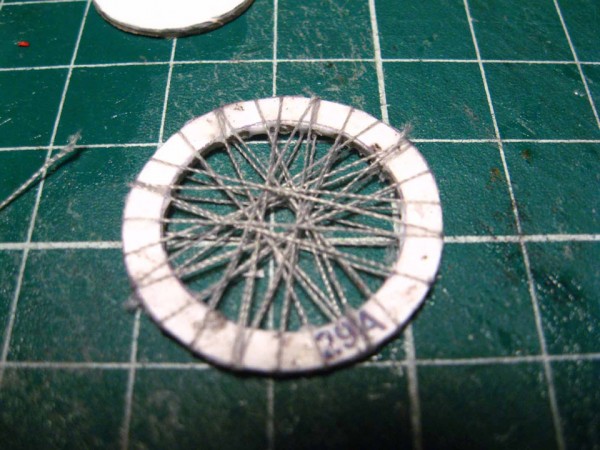 Once you've got those down, you're done as far as the spokes are concerned. After that you can build up the template on both sides by adding thicknesses of cardboard until you are happy with the thickness of the resulting tires.  You can then sand them round if you have the patience for that, or if you have a Dremel. I don't have either... 
Last edited by Jason; 02-27-2009 at 08:32 PM.
|
|
#4
02-27-2009, 08:13 AM
|
||||
|
||||
|
Making the hub
[This is Norman Gorn's own translation of his thread at Kartonbau.de in German:]
Time to make the hub of the wheel. For that we make a small roll from paper, about as wide as the tire is thick and with a diameter just slightly bigger than the whole in the middle of the spokes. The dimensions aren't critical as long as it looks good.  Keep in mind though that the width of the hub will determine the tension of the spokes and the wider the hub will be, the more it will spread the spokes apart with a resulting increase in tension and a possible warping of the wheel. This has happened to me but I was still able to straighten it out.
|
|
#5
02-27-2009, 08:14 AM
|
||||
|
||||
|
Inserting the hub
[This is Norman Gorn's own translation of his thread at Kartonbau.de in German:]
The next step is to wiggle the hub roll through the hole in the middle of the spokes. Since the hub is a little wider than the hole, it won't go through the hole on the other side but will push it outward. And that's exactly what we want.  As soon as the hub sits *IN* the hole on one side and has caught the spokes on the other side, glue it down on that other side where it can't push through. On the working side we still have to lift the spokes over the end of the hub that sticks out, just like granny used to do it when knitting.  We want the hub to end up wedged in between the two layers of threads. That's what will create the tension and that is where we glue the hub to the spokes to make sure it stays where it is.  Once you've got that done, you're finished!  The first thing you will notice is the totally unexpected stability of the spoked wheel. If you want, you can now cover the ends of the hubs with a little paper disc and that's it!  Kindest regards and have lots of fun winding your spokes, Norm (the famous airgoon )
Last edited by Jason; 02-27-2009 at 08:31 PM.
|
| Google Adsense |
|
#6
02-27-2009, 08:46 AM
|
||||
|
||||
|
Added to the downloads section
A cleaned-up version of this thread has been added as a pdf file to the downloads section:
PaperModelers.com - Downloads - Spoked wheels by Norman Gorn Leif Last edited by Jason; 02-28-2009 at 04:12 PM. Reason: Edited by request
|
|
#8
02-27-2009, 06:12 PM
|
||||
|
||||
|
Ok, great tutorial. I used it to make this first wheel for a paper motorcycle model my five year old wants me to make! The thing is a bit beyond my skill level but I will try. This tutorial was a big help! Thanks.
|
|
#9
02-27-2009, 06:29 PM
|
||||
|
||||
|
It looks good to me
|
|
#10
02-27-2009, 06:29 PM
|
|||
|
|||
|
Oooh. Not to be a bad soul but you can do much better than this. Ugh. Look at the wheels on my on Knoller - thread on Zealot? ...just for reference, I'm not good at this so I'm not trying to blow wind up my own skirt... Use fishing leader and then color it. Don't crowd the spoke density so much. The idea is the same but you can make it look very nice.
I'm not trying to um, pee (?) can I say that Rick? ...I'm mean that I think I can qualify now for the almost-Phil quasi-nutjob exception by now? Heh. - on this tutorial. The methods I think are sound but seriously you can do better. Shoot, I did. I have to say that I have been traumatized ever since and only build ships. But maybe that is another story. First piccie shows wheel spokes in progress. Second shows them attached to the plane. You be the judge. Set you sights high fellow modelers. If you imagine you can do it then you can. As I said the build thread is on Zealot (I think?). Carl
|
| Google Adsense |
 |
|
|


 Linear Mode

